Showing posts with label Art. Show all posts

17/03/2010

Origami

Japanese people came to enjoy paper folding (origami) during the Edo period (1603-1868) when the production of paper increased and that made it easier for most people to enjoy origami.

The  oldest origami book in the world was published in 1797 and is called Hiden Senbazuru Orikata (How To Fold 1000 Paper Cranes.)


We tested out different designs of origami and together, with the other P6. class, we tried to make 1000 paper cranes... AND WE SUCCEEDED!!! Here are some examples of what we also
made: paper pagodas, paper frogs, star boxes and paper cranes.

ENTERPRISE
We made different types of Origami for the school winter fair.  To help sell the products we dressed up in Kimonos and Happy jackets which we got from the Japanese Embassy in London.  In the
star boxes we put chewy santa sweets. We also sold Hokusai block
prints of the Great Wave and fans that we decorated with ink. The things that
we put on the fans were all associated with Japan like Mount Fuji and
cherry blossom.  The money that we raised is helping to build a new playground for the school.

Japanese Fans


Fans!!
There are 2 main kinds of fans in Japan. There are the flat fan (uchiwa) and the folding fan (sensu or ogi.) The flat fan is thought to come from Korea. This fan is usually carried in festivals. They are also given as an advertising gift from companies for the hot Japan weather.  This fan is also used for the general to indicate to his armies his commands. In wars you can use it as a weapon as well!
The folding fan is an invention of the Japanese people. It originated in Kyoto in about 670 AD. It is made out of bamboo and  paper. All the ones that were made with white paper would have love
poetry written on them and then they were presented to a loved one.
Buddhists use the same fans. At a ceremony no one would be perfectly dressed unless they carried a
sensu.  It is carried by singers of classical Japanese songs such as Rakugo.


Last term our class made our own Japanese fans. To start with we got one  plain paper folding fan and some Japanese brushes and ink. First of all we planned it on a piece of paper. We had to have at least one piece of Japanese writing on it. Next we lightly sketched our plan on to the actual fan. Then, carefully, we painted our designs on the fans with the ink. After they had dried, we outlined them in a black fine liner and got to take them home!

16/03/2010

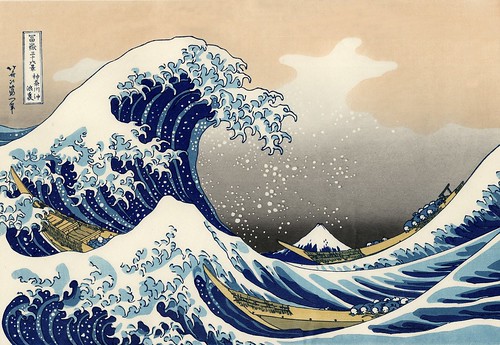
Hokusai Woodblock Prints (made from polystyrene!)


 Block prints are a quicker, easier and cheaper way of making art, so that more families can afford paintings for their houses. The famous Japanese artist Hokusai helped make these prints famous worldwide and this is how they are made...

We started off with one piece of polystyrene each per pair.  Since we were concentrating on Hokusai's most famous print The Great Wave, we lightly scraped the outline of the great wave and Mount Fuji. We then carefully broke the piece of polystyrene around the outline.

Next we coloured in the top half  (the sky) yellow, and the bottom (the sea) in light blue. Then we firmly pressed them both onto a piece of paper and held them for a bit, and took them off. After we had taken them off we saw the printed colours of the first layer of the sky, and the first colour of the sea. We then cut out the froth of the waves and whatever we wanted to stay light blue and the clouds and whatever we wanted to stay yellow. Next we, with paint rollers, painted the top part of the polystyrene over with red and the bottom over with the colour dark blue. Once again we pressed the two parts of polystyrene firmly over the paper again and after a bit, when we took the polystyrene off, we then found our almost finished picture.

Finally, using ink and small, thin brushes, we went over all the lines and drew curvy lines (the froth) over the wave itself.  We had our finished print!

15/03/2010

Carp Streamers

Putting up streamers in the shape of carp fish has been a spring tradition in Japan for many years. Colourful carp streamers look like they are flying in the blue sky. You can see carp streamers from the
end of April to the 5th of May. The tradition of putting up carp streamers is said to have begun during the Edo period.  On Children's Day, families with boys fly huge carp shaped streamers outside their house and display dolls of famous warriors and other heroes inside.  The carp are flown because they symbolise strength and success.  According to a Chinese legend, a carp swam upstream to become a
dragon.

HOW TO MAKE YOUR OWN
We made carp fish out of tissue paper and we will tell you how.
  1. First we got a big square of tissue paper and folded it in half.
  2. Then we drew half of a carp fish, cut it out and unfolded the paper.
  3. Then we glued the top of the carp together but we left the mouth unstuck.
  4. After that we got two pipe cleaners and knotted them together. We put the pipe cleaners around the inside of the mouth to keep it open.
  5. We used four coloured circles of tissue paper, two of one colour and two of another, for the eyes of the fish. One circle had to be smaller though, for the middle of the eye, so we folded two of the same colour circles in half and cut a semi-circle out of them and then unfolded them. Next we stuck down the eyes and got a sticker to stick in the middle for a pupil.
  6. After that we got some more mini circles and cut them in half, then we stuck them on both sides of the fish to make scales.
  7. Finally,we got coloured strips of tissue paper and glued them on the tail to make streamers.

Kokeshi Dolls


HISTORY
Kokeshi dolls are Japanese dolls originally from Northern Japan. They are handmade from wood and have a wooden trunk and a few simple lines to give detail on the face and kimono (traditional Japanese dress).  The dress is usually black, red and sometimes yellow, covered with a layer of wax to make it shiny. Kokeshi dolls lack arms and legs and on the bottom of every kokeshi doll there is the signature of the artist who  made it.


HOW WE MADE THEM
We made our kokeshi dolls by recycling vitality yoghurt pots and sanding them down until they were smooth and easy to paint. We mixed glue and paint to help the paint stick. We put one coat of one or two colours and then put designs on them. Every single one was different and lovely. For the heads we used polystyrene balls, about the same size as a ping-pong ball, which we drew faces and hair on them. When they were dry we glued the head to the body and left it to dry. Once we had left them to dry, we varnished them to make them shiny and to stop the pen on the head from smudging. When we were finished we had an army of kokeshi dolls. We hope you try making them at home too!